| Kusari-Gama | |
|---|---|
| |
| Statistics | |
| Strength | Medium |
| Speed | Low (to start), High (once started) |
| Range | High |
| Maximum Level | 3 |
| First Appearance | |
| Debut | Ninja Gaiden II |
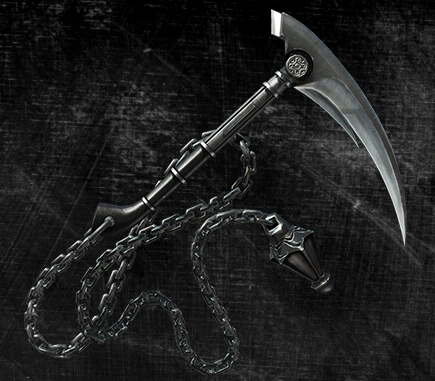
The Kusari-Gama (鎖鎌 Kusari Gama?, Chain Sickle) is a Ninja weapon consisting of a long chain with a sickle on one end and a heavy weight on the other, it is one of Ryu Hayabusa's available weapons in Ninja Gaiden II, Ninja Gaiden Sigma 2, and Ninja Gaiden 3: Razor's Edge. Its origin is said to have come from innovative peasant ninjas, whom were disallowed to own weapons developed the Kusarigama from farming tools such as the sickle and chain.
History[]
Quoted directly from the game:
The Kusari-gama, or chain-sickle, is a traditional Ninja weapon consisting of an iron weight on a chain attached to the handle of a sickle. The Kusari-gama is capable of a vast array of free-form attack techniques, but is difficult to control and practically useless in battle unless skillfully wielded. Made by the skilled craftsman Shishido Tessai, this paricular weapon's length of chain and heft of weight are at their conceivable limit, making it even more unpredictable and difficult to wield than normal. The legendary Shishido is well known for creating such strange and unique weaponry, but for whatever reason is met with much disdain by Muramasa.
Strengths and Weaknesses[]
Strengths
- Has a swing arc so wide it easily clears the whole screen
- Moderately fast
- Has various combinations of short and long range attacks
- Very efficient for crowd control
- Useful against large groups of enemies
- Has a guaranteed dismember technique for small enemies.
- Can Izuna Drop in Razor's Edge. (Input: X, Y, Y, X, Y)
Weaknesses
- Medium Strength weapon
- Little stun against large enemies
- Few wall attacks
- Some of the attacks are quite slow, making Ryu suffer against faster enemies
- Y mashing attack input reduced in Razor's Edge (Meaning you cannot perform the super long swing arc duration from the second game.)
Moves List[]
Ninja Gaiden 2/Sigma 2[]
Normal
- Face Strike: X, X, X, X, X
- Great Sweep (Lvl 2): X, X, X, X, Y
- Ear Slicer (Lvl 2): X, X, X, Y, Y, Y
- Raging Star (Lvl 3): X, X, X, Y, Y, Y, Y, Y
- Serpent Swing (Lvl 2): X, X, X, Y, Y, Forward + Y
- Midnight Blade (Lvl 2): X, X, X, Forward + X
- Shrike Drop (Throw)(Lvl 2): X, X, X, Forward + Hold X when hitting enemy
- Skull Shatterer: X, X, Y, Y
- Flying Vine (Lvl 2): X, X, Forward + Y
- Demon Cutter (Throw)(Lvl 2): X, X, Forward + Hold Y when hitting enemy
- Hunting Heavens: X, Y
- Falling Snow (Lvl 2): X, Y, Y, Y, X
- Temple Bell Drop (Lvl 2): X, Y, Y, Y, Y
- One Hundred Flames (Lvl 2): X, Y, Y, X, X
- Flying Vine (Lvl 2): X, Hold Y
- Demon Cutter (Throw)(Lvl 2): X, Hold Y when hitting enemy
- Flying Vine (Lvl 2): X, Forward + Y
- Demon Cutter (Throw)(Lvl 2): X, Forward + Hold Y when hitting enemy
- One Hundred Feet: Forward + X, X
- Fuji Drop (Lvl 2): Forward + X, X, X, X, X
- Thunderous Flying Sparrow (Lvl 2): Forward + X, X, X, Y
- Spiral Attack: Y, Y
- Reverse Great Spin (Lvl 2): Y, Y, Y, Y, Y
- Immerse Tragedy (Lvl 3): Y, Y, Y, Y, Y, Y
- Storm of Six Flowers: Hold Y
- Pounding Gate: Hold Y (Essence Technique)
- Dance of Nine Dragons: Hold Y (Ultimate Technique)
- Sweeping Clouds: Forward + Y
- Dancing Maple (Lvl 2): Forward + Y, Y, Y, X
- Giant Bell Drop (Lvl 2): Forward + Y, Y, Y, Y
- Flying Vine (Lvl 2): Forward + Hold Y
- Demon Cutter (Throw)(Lvl 2): Forward + Hold Y when hitting enemy
- Great Shears: While Running X
- Absence of Light: While Running Y
- Flowing Spin: Spin Control Stick 360 + Y
- Raging Wind (Lvl 2): Spin Control Stick 360 + Y, Y
- Furious Whirlwind (Lvl 3): Spin Control Stick 360 + Y, Y, Y
- Midnight Blade (Lvl 3): Spin Control Stick 360 + Y, Y, X
- Shrike Drop (Throw)(Lvl 3): Spin Control Stick 360 + Y, Y, Hold X when hitting enemy
- Flying Vine (Lvl 2): Spin Control Stick 360 + Y, X
- Demon Cutter (Throw)(Lvl 2): Spin Control Stick 360 + Y, Hold X when hitting enemy
- Music of the Haze: While Blocking X
- Sweeping Willow: While Blocking Y
- Hunter's Slash: Y next to down enemy
While Airborne
- Slicing Wind: X
- One Hundred Flames: Y, X, X
- Thunderous Light: Y, Y
- Flowing Spin: On Landing X
- Guillotine Throw (Throw): A + X while jumping just over human size enemy
- Flowing Dragon: X During Flying Bird Flip
- Giant Serpent Drop: Y During Flying Bird Flip
On Wall
- Flying Scythe: While Wall Running X or Y
- Flowing Dragon: X
- Giant Serpent Drop: Y
Aquatic
- Waterfall Breaker: While Running on Water X, X
- Falling Thunder Flying Sparrow: While Running on Water X, Y, Y
- Shell Spiral: While Running on Water Y
- Giant Toad Drop: Floating at water's surface X
- Falling Thunder Flying Sparrow: Floating at water's surface Y, Y
- Devastation Above: While Underwater X
- Insane Agitation: While Underwater Y
Ninja Gaiden 3: Razor's Edge[]
(Since Razor's Edge has every name for every input, the list here only provide the most relevant inputs per level.)
Standing and Sliding
- Twilight Storm: X, X, X, X, X 1
- Great Sweep: X, X, X, X, Y 1
- Night Storm: X, X, X, Y 1
- Skull Shatterer: X, X, X, Y, Y 2
- Dragon of Heaven Helix: X, X, X, Y, Y, Y 3
- Ground Gust: X, X, Forward X, X, X 1
- Midnight Blade: X, X, Forward X, X, Y 1
- Also X, X, Forward X, Y 1
- Sweeping Clouds: X, X, Y 1
- Enenra Sweep: X, X, Y, Y 2
- Great Shears: X, X, Y, Y, Y 3
- Kurikara: X, Forward X, X, X, X 1
- Raging Tiger Crush: X, Forward X, Y, Y, Y 1
- Hailstorm: X, Y, Y, X, X 1
- Izuna Drop (Throw): X, Y, Y, X, Y 2
- Manjushage: Forward X, X, X, X 1
- Deathly Beast Charge: Forward X, X, X, Y, Y 1
- Bloody Harvest: Forward X, X, Y 1
- Clear Mist: Forward X, Y, Y 1
- Can chain into any Standing Jump combo
- Flowing Spin: Y 1
- Furious Wind: Y, Y 2
- Furious Whirlwind: Y, Y, Y 3
- Flying Vine: Forward Y 1
- Can be follow up from any Standing/Sliding combo that ends with Y (i.e: X, X, Y, Forward Y)
- Demon Cutter (Throw): Forward Y (Hold when hit a human size enemy) 2
- Can be follow up from any Standing/Sliding combo that ends with Y
- Ryu will pull the enemy to him and will either:
- Dismember the enemy by the arm or leg.
- If the enemy is dismembered, Ryu will perform an Obliteration Technique.
- Storm of Six Flowers: Hold Y 1
- Storm Ascendant: 360 Spin Y 2
Running
- Mishaguji: X, X 1
- Absence of Light: Y 1
Standing Jump and Running Jump
- Hailstorm: X (If no enemy launched to air) 1
- Twisting Serpent: Y 1
- Hailstorm: Y, X, X 1
- Izuna Drop (Throw): Y, X, Y 2
- Shinja Drop Blast: Y, Y 1
- Can chain into Flying Vine or Demon Cutter
Sliding Hit
- Clear Cloud: X 1
- Can chain into any Standing Jump Combo
- Severing Heaven Fang: Y 1
Landing
- Storm Ascendant: X 1
- Mortal Strike: Y 1
- Furious Wind: Y, Y 2
- Furious Whirlwind: Y, Y, Y 3
Wall Jump and Wall Run
- Hailstorm: X 1
- Great Serpent Drop Blast: Y 1
- Flying Scythe: Wall Run Y 1
- Hailstorm: X (if Flying Scythe was blocked) 1
- Flowing Dragon: Y (if Flying Scythe was blocked) 1
Flying Bird Flip
- Flowing Dragon: X 1
- Great Serpent Drop Blast: Y 1
Sabaki/Counter Attack
- Gossamer Top: X 1
- Flowing Mist: Y 1
- Can chain into any Standing Jump combo
Trivia[]
- Largest area of effect and range.
- Ryu's method of wielding the Kusarigama is fairly unique. Traditionally the Kusarigama was wielded by holding the sickle while swinging the chain to bludgeon or entangle opponents and using the sickle as a close range coup de grace. Common depictions of the Kusarigama in fictional works have characters swinging the blade end of the Kusarigama. Ryu himself alternates between these two forms and also spins both ends of the Kusarigama while holding the chain via the middle, as most obviously seen in the Immense Tragedy attack.
- A minor glitch can occur when Ryu uses Demon Cutter on Genshin; if Demon Cutter connects Ryu will attempt to pull Genshin towards him. Genshin, being immune to throws, will behave normally. If he approaches or attacks Ryu during his pull animation, Ryu will finish the attack, becoming invincible for a couple seconds and dealing a modest amount of damage.
Gallery[]
")
")
")
")
")
")