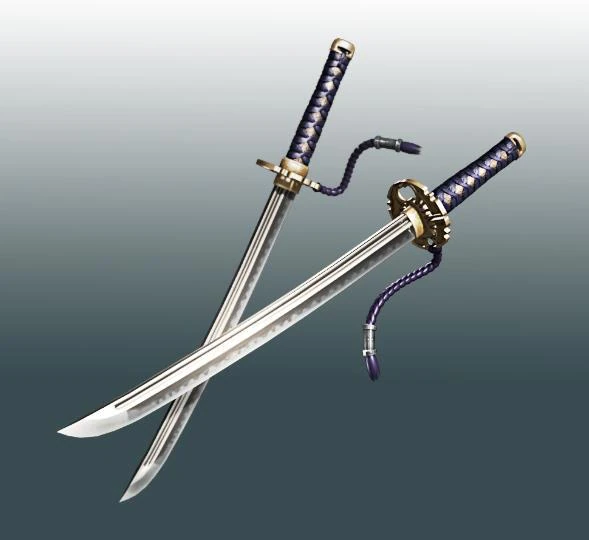
| Fuma Kodachi | |
|---|---|
| |
| Statistics | |
| Strength | Medium |
| Speed | Fast |
| Range | Short |
| Maximum Level | N/A (Σ2) 3 (3:RE) |
| First Appearance | |
| Debut | Ninja Gaiden Sigma 2 |
The Fuma Kodachi (風舞小太刀;Wind Dancer Short Swords) is the weapon set used by Ayane in Ninja Gaiden Sigma 2, Ninja Gaiden 3: Razor's Edge.
Description[]
A pair of short swords of the sort used by legendary Ninja. Kodachi is a catch-all term for any short Japanese sword. Easy to manipulate, they are ideal weapons for rapid slashing attacks to take the initiative and keep an enemy on his toes. They are particularly suitable as compliments to physical attacks, allowing one to weave kicks and slices into a combo offensive that denies an enemy the chance to counterattack. Forged with blades as thin as possible for lightness, what they lack in reach they make up for with damage in close-range attacks.
Plot[]
Ninja Gaiden Sigma 2[]
During the Black Spider Ninja Clan's attempt to revive Vazdah, Ayane utilized the Fuma Kodachi in the Aqua Capital to recover the Eye of the Dragon from Obaba.
Ninja Gaiden 3: Razor's Edge[]
During the Lords of Alchemy's seven day terrorist campaign, Ayane once again utilized the Fuma Kodachi to great effect, stopping the terrorists from taking over Paris as well as placing a tracker on the Black Narwhal.
Moves list[]
Ninja Gaiden Sigma 2[]
(Square = X on Xbox, Triangle = Y on Xbox)
Standing
- Power Blade: S
- Violet Fireblade: S, S, S, S, S, S
- Godfoot Axe: T
- Erupting Sea Fire: T, T, T
- Supreme Twin Blades: Forward S, S, S
- Descending Eclipse: S, S, T, T
- Vortex Blade: S, S, Forward S, S
- Twinbrace Blade: S, S, S, T, T
- Divine Crush Blade: S, S, S, S, T
- Aeolian Dust Blade: S, S, S, S, S, T
- Lightwing Izuna (Throw): S, Y, S, S, S, S, S, T
- Dance of the Gods: Hold T
- Dance of the Divind Wind: Hold T Essence Charge
- Dance of Divine Fury: Hold T Essence Charge Max
- Raging God Izuna (Throw): During Dance of the Divine Fury T
- Ohantom Tempest: Forward T, T
- Misty Shadow Combo Blade: While Running S, S
- Phantom Tempest: While Running T, T
- Phantom Waltz: 360 Spin T
- Falling Orchid Guard: While Blocking S
- Moonshadow Ring: While Blocking T
Standing Jump
- Heaven Cut: S
- Wind Slice: T, T
Forward Jump
- Zephyr Cut: S
- Afterglow Bracer: Forward T
- Dark Raven (Throw): Near Enemy X+S
Wall
- Dark Star: Wall Run S or T
- Violet Fireblade: On Wall S, S, S
- God's Crushing Fury: On Wall S, S, T
- Outshining Divine Bracer: On Wall T
Flying Bird Flip
- Wind Slice: S, T
Outshining Divine Bracer: T
Ninja Gaiden 3: Razor's Edge[]
(Since Razor's Edge has every name for every input, the list here only provide the most relevant inputs per level.)
Standing and Sliding
- Gleaming Wolf Blade: X, X, X, X, X 1
- Whirlwind Kick: X, X, X, X, Y, Y 3
- Twin Aegis Horn: X, X, X, Y 1
- Aegis Cross: X, X, X, Y, Y 2
- Aegis Reaper: X, X, X, Y, Y, Y 3
- Hurricane Blade: X, X, Forward X 1
- Vortex Blade: X, X, Forward X, X 2
- Cyclone Blade: X, X, Forward X, X, X 3
- Cyclone Destroyer: X, X, Forward X, X, X, Y
- Can chain into any Standing Jump combos
- Vortex Destroyer: X, X, Forward X, X, Y 2
- Can chain into any Standing Jump combos
- Hurricane Destroyer: X, X, Forward X, Y 1
- Can chain into any Standind Jump combos
- Divine Hatchet Strike: X, X, Y 1
- Hatchet Dragon Flash: X, X, Y, Y 2
- Reverse Hatchet Strike: X, X, Y, Y, Y 3
- Butterfly Whirlweaver: X, Y, X, X, X, X 1
- Lightwing Izuna (Throw): X, Y, X, X, X, Y 2
- Violent Ascent: Forward X, X, X 1
- Violent Dragon Quake: Forward X, X, X, X 2
- Violent Shattering: Forward X, X, X, X, X 3
- Violent Destroyer: Forward X, X, X, Y 2
- Can chain into any Standing Jump combos
- Violent Weaver: Forward X, X, Y 1
- Violent Dragon Flash: Forward X, X, Y, Y 2
- Violent Wave: Forward X, X, Y, Y, Y 3
- Destroyer: Forward X, Y 1
- Hajin-Mon Kick: Y 1
- Mugen Reverse Kick: Y, Y 2
- Mugen Zephyr: Y, Y, Y 3
- Phantom Spear: Forward Y 1
- Phantom Tempest Forward Y, Y 2
- Can chain into any Standing Jump combos
- Dance of the Hajin: Hold Y 1
- Crimson Spin: 360 Spin Y 2
Running
- Misty Shadow Blade: X 1
- Misty Shadow Combo Blade: X, X 2
- Phantom Spear: Y 1
- Phantom Tempest: Y, Y 2
- Can chain into any Standing Jump combos
Standing Jump
- Tempest Slash: X (If no enemy launched to air) 1
- Butterfly Whirlweaver: X, X, X, X 1
- Lightwing Izuna: X, X, X, Y 2
- Thunder Cut: Y 1
- Wind Slice: Y, Y 3
- Celestial Arc: Y (Must hit enemy to air), Y 3
- Butterfly Whirlweaver: Y (Must hit enemy to air), Y, X, X, X, X 3
- Lightwing Izuna: Y (Must hit enemy to air), Y, X, X, X, Y 3
- Destroyer Drop: Y (Must hit enemy to air), Y, Y 3
Running Jump
- Tempest Slash: X 1
- Destroyer: X, Y 1
- Can chain into any Standing Jump combos
- Thunder Cut: Y 1
- Wind Slice: Y, Y 3
- Celestial Arc: Y (Must hit enemy to air), Y 3
- Butterfly Whirlweaver: Y (Must hit enemy to air), Y, X, X, X, X 3
- Lightwing Izuna: Y (Must hit enemy to air), Y, X, X, X, Y 3
- Destroyer Drop: Y (Must hit enemy to air), Y, Y 3
- Afterglow Bracer: Forward Y 1
- God's Crushing Fury: Forward Y, Y 2
- Can chain into any Standing Jump combos
Sliding Hit
- Butterfly Whirlweaver: X, X, X, X 1
- Lightwing Izuna: X, X, X, Y 2
- Seven Star Slice: Y
Wall Jump and Wall Run
- Tempest Slash: X 1
- Destroyer: X, Y 1
- Can chain into any Standing Jump combos
- Dark Star: Y 1
- Afterglow Bracer: Wall Run Y 1
Flying Bird Flip
- Wind Slice: X, Y 1
- Hajin Drop Kick: Y 1
Sabaki/Counter Attack
- Falling Orchid Guard: X 1
- Moonshadow Ring: Y 1
- Can chain into any Standing Jump combos
Gallery[]
")
")